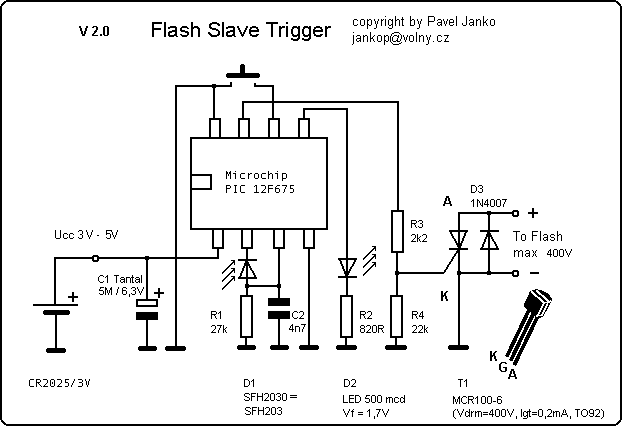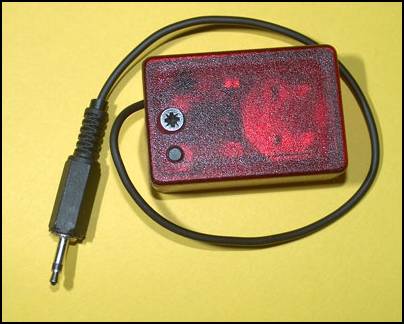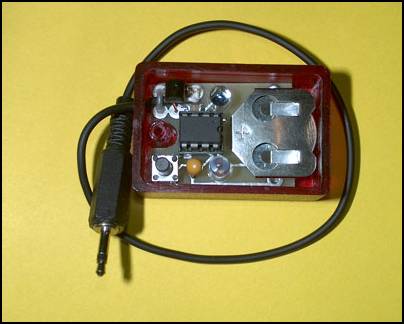
The synchronizer ensures a contact-free, optical synchronization of external photographic flashguns. The triggering of the external flash is derived from embedded flashes of a camera. It can be used for both digital and "analogous" cameras or for a remote synchronization of the actual flash units. Its use is optimal especially with digital cameras (DC), where extraordinary adaptability for different systems will stand out. It is capable of eliminating the effect of any measuring pre-flashes. The synchronizer thus perfectly fulfils the role of a device often called the Slave Flash Trigger (SFT). Thanks to an optical coupling, it enables safely to use even the oldest flashguns that could otherwise damage DC by high voltage ignition. The Slave Flash Trigger enables to place the external flashgun in the close proximity of DC, but thanks to high sensitivity the flashgun can be even tens of metres away from the camera, if needed. Having such sensitivity, the device is remarkable with high resistance against the effects of ambient lighting and the interference by varying light sources. Also, the operation outside under sunshine does not make problems for it thanks to an adaptation algorithm. Not a negligible advantage is the possibility of its simple and safe application with cameras to which otherwise the external flashguns cannot be connected at all.
THIS SOFTWARE CAN FREELY BE USED ONLY FOR NON-COMMERCIAL PURPOSES. THE AUTHOR PROVIDES THIS SOFTWARE "AS IS", ABSOLUTELY WITHOUT ANY GUARANTEES, AND DOES NOT ASSUME ANY RESPONSIBILITY FOR ITS QUALITY, FUNCTIONALITY OR ANY DAMAGES INCURRED BY USING THIS SOFTWARE. TO CLAIM ANY COMPENSATION FOR DAMAGES FROM THE AUTHOR IS THEREFORE FULLY EXCLUDED.
The program is in the HEX INTEL format and includes a configuration word.

The Slave Flash Trigger is switched on/off by pressing the push button. When switched on, one to three flickers of the indicator lamp signalizes the programmed mode. One flicker determines that the flash will be fired at each flash. Two flickers indicate that the flash is fired at the second flash. Three flickers mean that the external flash is fired not earlier than at the third flash. The indicator lamp, after the Slave Flash Trigger is switched on, does not glow permanently due to the maximum saving of power. Thus, the operating time of about 300 hours is achieved for one battery.
The switch-off is signalled by the slow extinguishing of the indicator lamp. If the Slave Flash Trigger is not switched off by the push button manually, then it is switched off automatically in half an hour from the last captured flash.
First it is necessary to set the required parameters on the camera, if such setting exists. It is possible to put the Slave Flash Trigger into a programming mode from any position by a prolonged press of the push button for about 3 seconds. Then the indicator lamp will glow continuously for one minute. During this time the device is capable of receiving the sequence of flashes. Now one need only take one picture by a camera with the active internal flash near the Slave Flash Trigger in a programming mode.
Sensitivity is intentionally markedly reduced in the programming mode so that disturbing pulses cannot be captured. But it is not optimal to program the unit from the close proximity; the most advantageous is the reflected light of the flash.
Capturing the programming sequence (flashes of the flash unit of a camera) is signalled by a time lag of approximately 3 s by going into the "ON" state with a corresponding flickering of the indicator lamp. Then the device is immediately ready for action. If the Slave Flash Trigger in the programming mode does not capture any flash sequence, then it turns off after one minute and the preceding programming is kept. The programmed properties are kept, even after the battery is switched off or removed, until the next programming, if any. Because the device also accepts the time between flashes in certain tolerance limits, it is necessary to make a new programming when changing the mode of photographing or the type of DC. It is above all the essential change in the shutter speed and the type of synchronization of internal flash. It is also generally necessary to make a re-programming of the Slave Flash Trigger when activating/deactivating the function "Red Eye Reduction".
If in the programming mode the flash is not captured, but the control push button is pressed, then the flash is fired. The Slave Flash Trigger will go into the "ON" state. This is convenient for the check of the proper interconnection and the function of the Slave Flash Trigger with a flash. The external flashgun must be, of course, connected, switched on and charged. This procedure has no effect on the preceding programming.
The verification of the proper function of the Slave Flash Trigger when encountering problems can be performed simply by photographing a prepared external flash. If the flash is lighted up on the picture, then the synchronization is in order.
When firing a flash through the Slave Flash Trigger, also the indicator lamp is simultaneously lighted up for a moment, thus signalling the capture of the flash.
If during a routine work the indicator lamp quickly flickers for a period of about 2 s after a flash, it means in great likelihood that the Slave Flash Trigger is misprogrammed and the external flash was fired untimely.
Lithium 3V type CR2025 for about 300 hours of operation
Connector Jack 2.5 mm/mono, switch not higher than 400V, plus a pole on the centre contact - tip of the connector.
The lag of the make pulse: approx. 100 microseconds from the arrival of the control flash.
The length of the make pulse: approx. 13ms.
The maximum frequency of repetition of the make pulse for external flash: approx. 4Hz.
Before changing the battery, disconnect the Slave Flash trigger from the flashgun! Then remove the battery from the holder with your fingers or slightly push it out with a nonconductive object, e.g. a match.
After the removal of the battery, wait about 1 - 2 minutes before inserting a new one!!!This time is needed for discharging residual charges and the reset of the system. If you place the battery without delay, the system would not have to respond to the control push button. But the device will not be damaged. The battery must be removed and re-inserted. Before closing the cover, verify the functionality by pressing the push button. This fact is given by the requirement for the extremely low consumption of electronic circuits.
Use only lithium batteries CR 2025. Insert the battery with its positive pole towards sign "+" on the battery holder. The improper insertion of the battery means its destruction. Except for battery removal, the inner part of the Slave Flash Trigger is always under voltage. Therefore, do not unnecessarily touch the interior and, in particular, do not short the metal inner parts, the electronic circuits could be damaged. Handle the battery in compliance with the manufacturer's instructions and do not try to charge it!
Do not open the device if connected to the flashgun!
The output of the Slave Flash Trigger circuit is capable of switching voltage to 400 V. Higher voltage damages the device. For the proper function it is also necessary to keep the appropriate polarity of the switched signal. A protective diode is connected to the switch against the polarity inversion of the output. Connect only photographic flashguns.
If you wish the Slave Flash Trigger to respond at every flash, you can program it through the external flashgun itself by pressing its test push button or by closing its contacts. Then the Slave Flash Trigger should flicker just once when switched on.
The Slave Flash Trigger is capable, thanks to a special algorithm, of working basically with any number of pre-flashes if it is properly programmed for this sequence by the above-mentioned procedure. When switched on, however, the indicator lamp will flicker no more than three times.
Some flashguns have their negative pole of the make signal on the centre contact. Then the Slave Flash Trigger is not capable of firing the flash. In this case it is necessary to check the polarity by measurement and to ensure polarity inversion.
The flash for reducing the negative effect of red eyes ("Red Eye Reduction") made by a camera is about 0.5 - 1 s ahead of picture exposure and is very well perceptible with the naked eye. In many cases the Slave Flash Trigger does not require re-programming when activating/deactivating "Red Eye Reduction". However, it depends on the properties of your camera and it must be tested with a given type of DC. If your camera uses a single flash for this function and simultaneously uses a measuring pre-flash, then it is usually enough to program the Slave Flash Trigger only without the pre-flash and the functionality is ensured also after the activation of "Red Eye Reduction".
If continuous light is applied for "Red Eye Reduction", then it is not necessary, of course, to perform the re-programming when activating/deactivating this function.
Do not forget that only the aperture has an essential effect on the exposure of the camera when using a flashgun. A change in the shutter speed with respect to the short time of duration of the flash has no effect on the result achieved by the light of the flash. The shutter speed determines only a portion of the daylight of a scene on the picture.
The "Red Eye" effect depends, besides the layout of photographed persons, on the angle that is formed by the axis of the lens and the flashgun. When using a powerful flashgun, which is attached to the camera on an arm, in darkness at higher distances and on a group of people, you will most probably achieve the "Vampires' Ball" effect. The only option is to direct the light of the external flashgun much away from the direction of photographing by reflection or to place the flashgun on a suitable pad well away from the camera.
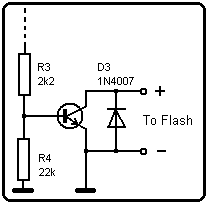
If using the synchronizer exclusively with "Low Voltage Ignition" flashes, i.e. with low voltage on make contacts, it is suitable to replace the thyristor virtually by any npn transistor without no change of other components.
